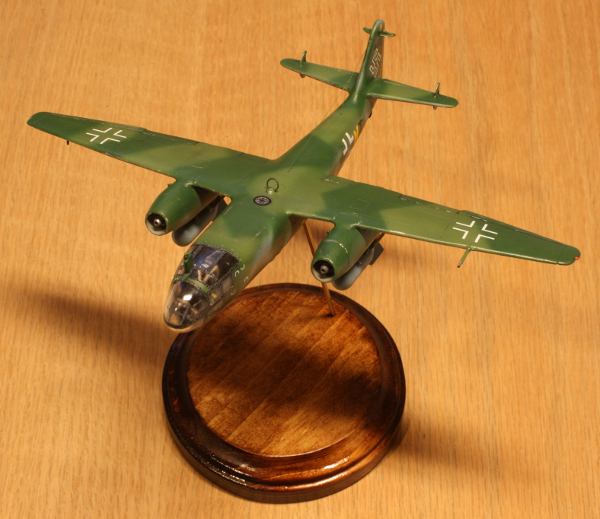
Arado 234 B-2
1/72 scale model by
Randy Asplund
7 inches long X 8 inch wingspan
The following article is about how I made a pair of 1/72 scale Arado 234 model aircraft and super-detailed them.
Building the Arado 234 B-2 and Ar 234 C-3 Blitz, the world's first operational jet bomber.
by
Building the Arado 234 B-2 and Ar 234 C-3 Blitz, the world's first operational jet bomber.
© Randy Asplund
11/17/2013
I love this aircraft. It was
called the Blitz for good reason. It started out as a very high speed
reconnaissance aircraft that pretty much could out-run anything. Later
it was made into a bomber and since it was a little slower with bombs
there was a periscope added to look backwards and a pair of aft firing
machine guns mounted in the lower fuselage. At first it took off from a
trolley and had to land on skids. Then they added tricycle landing
gear. Eventually the two jet engines were needed more for the
Messerschmitt 262 fighter, so they swapped them for four of a smaller
type. It made one really crazy, futuristic machine in a day when the
best aircraft were still flinging propellers.
This model took over 40 years to build... well, sorta. The Germans designed and put the first one in action in just a few years. I've always loved the look of this aircraft, ever since my friend Keller Laros bought the original kit back when he was about 9 years old. He happily assembled it, painted it with a glossy light blue underneath, and camouflaged it with brushed on blotches of the same pale blue and more blotches of light & dark grey. This was pretty advanced stuff for a kid his age. A couple of years later, Keller moved across the continent, but he gave me the now somewhat broken Ar 234 model. At some point I kit-bashed the front into something else, and it sat in my basement for decades in a box of broken plastic model airplane bits.
But this Ar 234 was not forgotten. I still liked the shape of it, and back around 1999 I bought another one made by the Matchbox company. It was a pretty sorry kit, with a minimum of raised panel lines, and not terribly accurate, but it had one interesting thing going for it- There were extra parts so you could build it as either the 2 engined Ar 234 B-2 or as a 4 engined Ar 234 C. Hmmmmm...... I started thinking about the old Ar 234 that Keller had left me.
The nose was gone from Keller's model, and it was missing some parts. It had been the 2 engine 234-B type, but the engines were a loss. But no problem! The Matchbox kit had the alternative engines and the two different nose sections for the different versions. I would need to manufacture some new parts and build up with a lot of putty, but the challenge was tantalizing.
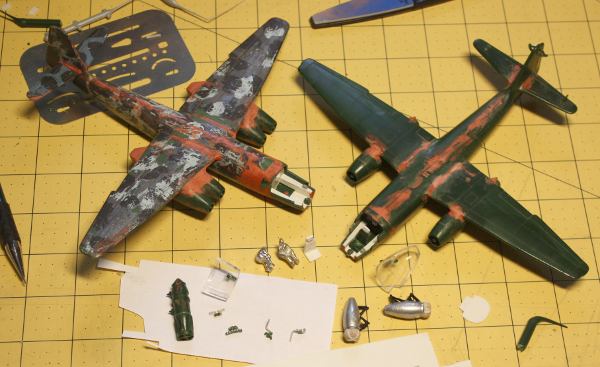
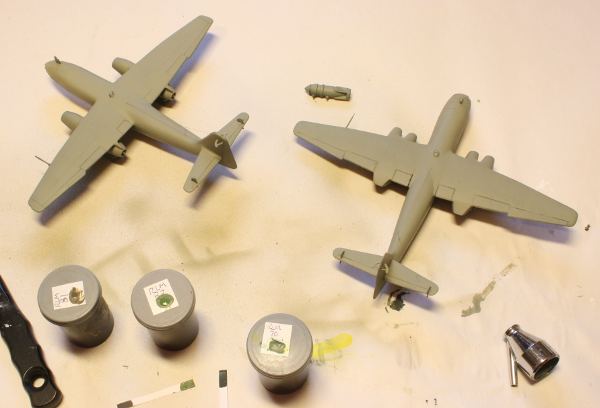
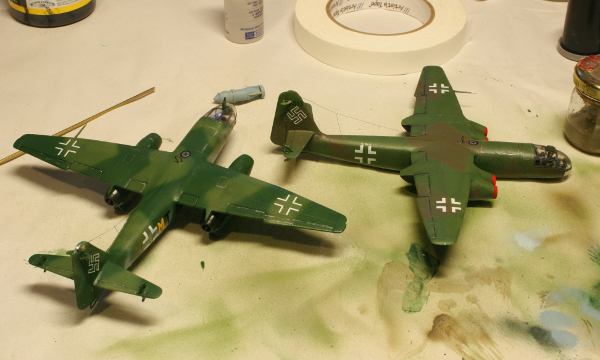
On the left is the original 1/72 scale AR 234 from the late 1960's with the 4 new engines of the Matchbox kit (on the right) and the new nose added. You can see what remains of my childhood friend's paint job. I have started the cockpit detailing and I have reworked the R.A.T.O. units.
The Matchbox kit has a lot of problems. The control arms are way too big, bomb fins are way too thick, of course there are no bomb rack arms and the R.A.T.O. units (rocket assist take off thruster pods) have the crappiest, woosed-out attachment braces imaginable. Instead of being made of rod pieces, they are solid sheet with the braces depicted in raised relief. What a lazy company. One is expected to paint the areas in between these raised moldings to look somehow invisible. Just another reason why the Matchbox kit can be considered as either a toy or an expert's time vampire.
And then there is the nose. All of that clear canopy will show everything inside, but there is virtually nothing in either model. Well, to be fair, Matchbox made a toy, so they probably expected kids to craze over the canopy with sloppy glue on their fingers so we couldn't see inside anyway. They give you nothing in there but a bare minimal seat and instrument console. It was clear that even if I accepted other flaws in the kit, a lack of anything inside here would make it look like junk. So I decided that it really needed a full cockpit with a pilot. The average person wouldn't notice minor errors of overall outside configuration, but being able to see a richness of detail inside the canopy would really help turn this kit around. I'm not going for perfect at 1/72 scale, just believable. Only an expert will know the difference.
The last very obvious characteristic that is missing is the parachute cable. Arado put a parachute inside a little hatch under the rear fuselage and then ran the cable out, under the belly of the aircraft, where it dangles a loop that comes back and attaches a mounting point in the tail. Without these, it just isn't right.
So, about 5-1/2 years ago I hauled these two AR 234's out of storage and decided to get to work. I had a short window of time and figured I'd just build them between painting commissions. It was a lot of work. The first job was to scrape off the built-up thickness of paint blotches on Keller's model. He had used a pretty viscous paint, and I had to use a curved knife and a lot of patience to take it down smoothly. Sanding would have done it, but I'd have lost all of the surface details.
I decided that I would build the 234 B-2 as the full Matchbox kit and convert Keller's 234 into a C-3 version with the four engines. Since his wings wee not designed for that, I had a lot of reconfiguring to do. You can see a lot of Bondo putty in the photo, which I then had to carve. I also sawed off what was left of the nose and attached the C-3 nose from the matchbox kit. More putty and more carving. Then I cast a couple of pilots from pewter. The next step was to fix the darned R.A.T.O. units. I should have made up a bunch of sprue wire and constructed them. It would have looked more correct, but I was already running out of time, so I simply cut away the solid areas between the bars, The parachute packs were terrible, so I got rid of them too, and replaced them with scratch built packs using paper for the retaining straps.
Then I had a commission come up and had to put the Arados aside “temporarily.” They haunted me for several years. They sat in the kit box on a shelf in my studio, calling to me... “Randy... Randy.... Finish those commissions so you have time to build us!” But 5 and a half years went by and many other things were calling to me with stronger demands. These were mostly professional art jobs, and the poor Ar 234's collected more and more dust. But recently I had the fortune to land a big job requiring me to buy special calf vellum from England. I couldn't start until it arrived, so I decided that of all the things I wanted to catch-up on, it was time to finish the AR 234's!
I looked in the box: 2 half-built aircraft. One dreadfully bad instruction sheet with important information ommitted, and such a bad printing job that it was literally impossible to figure out the recommended paint job. There were the R.A.T.O. units, but I would be building with gear up because 1/72 scale models like this usually have really poor landing gear and no detail in the bays, and because airplanes are AIR planes, not cars! They belong in the sky. So I decided not to use any of that stuff. What else... The decal sheet. Hmmmm, typical omission of the Swastikas for the tail. I agree with pretty much every modeler out there when I say that the laws that prevent companies from selling historically accurate decals in certain countries are quite over the top and promote ignorance. I'd have to create my own.
This job was getting more and more complicated. I did some good research. I watched old VHS tapes of several documentaries showing Ar 234s. I had previously photographed the one in the Smithsonion in great detail, I found cut away view drawings from front and back angles, I downloaded pictures of the cockpit, and I found plenty of illustrations of markings. I based all of my colors on Michael Ulmann's book , Luftwaffe Colours 1935-1945. I was ready to go!
Cockpit detailing on the Arado
234 B and C versions
Cockpits first. I had to build the floor and consoles. I also added some console boxes on the cabin walls. I built new seats. Some of the reference information was in conflict, so I had to wing it in a few places. Seat belts were made from paper and attached to the pilots' crotches before painting. Then after things were painted and the pilots epoxied to the seats, I attached the loose seat belt ends to the seats. There was no way I was going to make all of the things in this cockpit in 1/72 scale, but the thought was, if I have the enough of the obvious stuff, the main forms, and paint-in a lot of the dials and switches, it will be convincing enough. So I made the throttles, and a zig-zag pair of control columns. The challenge was the rudder peddles. These protrude past the end of the floor on braces, right into the open glassed part of the nose bubble. Then I had to make the small hydraulic cylinders on the back of the rudder peddles and the obvious tubes that lead from them, curve out into the bubble, and then head under the floor. While I was at it, I also made the “N” shaped braces for the floor out of very thin sprue wire.
The most obvious structure in the cockpit is the control console. It is attached to the center rib around the nose bubble, suspended on a few bracing tubes. You also see all of the cylinders of the gages behind it, and the back is wood colored. Unfortunately, Matchbox wanted you to just glue their control console to a couple of obvious prongs sticking out from the insides of the bubble. This couldn't help but look bad.
The challenge here was to carve and then grind off the molded prongs and make it look like they were never there, then build the very tiny mounting rods, and then get them painted and glued securely in the correct places. This was very difficult. Very, very difficult. I carefully whittled the plastic prongs with a very pointed knife until they were close, and then hand-ground them slowly by hand with a Dremel bit held in my fingers. Any speed would melt the plastic or cause distortion of the final material, but this grinding still roughed the plastic. I had to polish the inside clear again. You can imagine how difficult it would be to hand-sand on the inside of a very tight compound curve on this scale. And I had to do it twice! Eventually, I had the control consoles built and painted. I reasoned that going the extra mile to wire them would just not be necessary. Between all the little bits and the mounting rods, I still had a lot of detail. One has to draw the line somewhere. If it were a better kit, I think I would have done it...
The interior colors of the AR 234 are back areas in RLM 2, which is a light, dull, slightly yellowish grey. But most of what you see in the cockpit are panels and gear, which are a very dark, neutral RLM 66, which is just a little lighter than black. The instruments are mostly black, so a lot of the interior is very dark. exceptions are the yellow throttle handles and front console wires, and a few white & red details, and the markings on white on the dials, which I painted by making white dots and filling them almost to the edge with black. I drybrushed the edges of objects painted in RLM 66 to show the edges. This reveals the form and implies worn paint. Contrasting color on details helps make the interior look convincing, even though I didn't put everything in. I also added the part of the periscopes that descend into the cockpits.
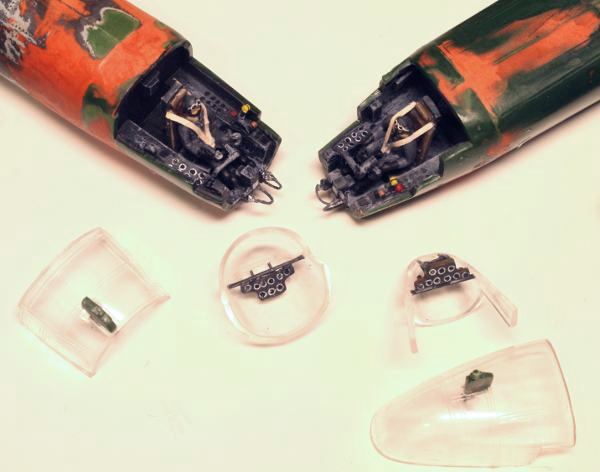
Once the cockpits were finished, I assembled and mounted the canopies. The problem is that model cement actually melts the plastic to weld the parts together. While this is fine for most of the model, the clear pieces can't take that. They fog over. And if you aren't careful, getting any glue on a window surface is a pure disaster (as every 10 year old model builder knows well). The good news is that they make a glue for canopies. The bad news is that it holds like crap. It is marginally better than Elmer's, which also dries very clear. Regardless, if you use Elmer's or canopy glue, make sure to rough the mating edges to improve adhesion. The Matchbox canopies don't fit the Matchbox nose fuselage sections very well either, so that meant adding some putty around the edges. Before attaching, I used the clear (not matte clear) magic tape to mask the canopies. I applied one small piece at a time to each window pane and then used a fresh #11 X-Acto tip to carefully cut the shape. I move from one pane to the next, and the next. It is tedious, but it is a great way to be accurate. To follow compound curves, it requires thinner pieces at the curves and overlapping before cutting. The real Ar 234 canopy is attached with light rivets over top of the frame structure, not inside of the frame. That means we see the frame through the clear panes, so they appear glossy.
The Ar 234 B and C canopies are masked before being joined to the fuselage
Once the canopies were attached to the fuselages, I painted them RLM 66, then added very light grey dots to represent the rivets. Then I sprayed the entire nose with gloss lacquer. This produced the desired effect of a totally glassed nose with the frames inside. Of course that all had to be masked over with low tack masking tape so I could paint the camouflage and leave that matte.
The bombs were next. No bomb racks, and the bombs looked clunky. The first thing was to file down the fins so they looked more in scale. When the bombs were puttied and smoothed out I still had the ring on the large center bomb to change. It was just way too thick, so I filed it down rather than building a new fin ring from paper. It should also get a small hole drilled into the center of the tail. The large bomb was then painted, since the mounting pins would hold it well enough with friction. I want it removable for display options.
I made the bomb rack arms by cutting pieces of sheet rather than gluing up sprue wire. This made them stronger. Since bombs were ether RLM 70 (very dark, dull green) or the same color as the aircraft undersides, I decided to paint them the later colors and attach them before painting.
I made the parachute cables from brass wound guitar strings. I used these because it gives the texture of the wound cable (which comes out beautifully when drybrushed), and because I could bend it to shape before attaching it. This is important if you want the shape to resemble the full scale cable on the real aircraft. I drilled a hole the size of the wire where it exits the parachute bay, and another in the tail blister for the mounting point. There is also a large connecting plug at the tail mount point, so I stretched more sprue, drilled a hole down its axis, and cut the cylindrical plug from that. Passing the wire through it, the plug gets glued to the aircraft, while the wire gets trapped inside the fuselage on both ends. Obviously, these had to be attached after painting them and the aircraft separately.
Antennae: There are four kinds on these aircraft. There is the suppressed D/F ariel on top of the forward fuselage. It looks like a silver disk with a black asterisk on it. It is flush with the fuselage and was missing on my kits. Maybe it got filed away when I was filling the fuselage gaps. It was hand painted onto both models. The second is the ring antenna for the FuG 25 A IFF. This was made from a steel wire that was bent into a near full circle and attached to a small blister by drilling holes and inserting the ends of the wire. This looks far more real than the bump with a thick plastic ring that comes with the kit. I made a second one for the Ar 234 C. The third antenna is a vertical rod protruding under the starboard outer wing. This is also FuG 25.
The last antenna is the radio antenna. This starts on the fuselage center near the trailing edge of the wing and terminates on the leading upper edge of the vertical stabilizer. It has a second wire that attaches to the main wire and terminates on the aft-center fuselage. I tried a great many materials for 1/72 scale radio wire and wing bracing wire. At first was the recommended household thread. It always gets fuzzy and often ages to become slack. Waxing it gets in the way of glue, and it just looks wrong. Most nylon lines are too thick, and the glues don't like it. Metal can work, but it is hard to tighten, and it kinks and sheds paint eventually. I even once rigged a WWI biplane with human hair! Nothing worked well. Then I found the exact right stuff. I now use Coats Transparent polyester thread from the fabric store. It is black, smooth and very tough. It is also REALLY thin. The numbers on the spool are: “S995 D0 9950” and “CA00011.” And here's how I use it-
It knots really well, so I tie a knot in the end. Then I drill the smallest hole possible. I put the end into the hole. I dip the tip of a piece of sprue wire in glue before I use it to plug the hole tightly with friction helping the glue. I cut the sprue flush while the glue is still fresh and use a meal tool to rub it flush while it is still soft. The second end of the wire doesn't need a knot. I simply put it over the hole and secure it with a piece of tape right at the edge of the hole. Then I dip another piece of sprue wire in the glue and peg it in. The sprue will make a good, tight friction fit that is pretty strong when dry. I slice the protruding sprue and butt end of the wire with a very sharp blade. For extra detail the anchors can be simulated with a blob of glue, putty, or even a sprue wire that drew out as a tube. To create the second wire I tied it onto the first wire before it was mounted. I waited for the mounting points on the first wire to dry securely, and then secured the butt end of the second line to the fuselage just like I did with the butt end of the first line.
When dry, I slid the knot connecting the two wires aft a little, and this created the stretched down look of the way it is rigged on the real one. The fact that the knot can slide before you glue it is a godsend for proper positioning. Now I could secure the knot with a small dab of glue. It seems to hold well. In fact, the whole rig is strong enough to bump accidentally while handling the model as you are finishing it. And if you spray paint, it will not grow fat from the spray. In fact, a little color helps make it just visible enough to notice. Being very, very thin, it is hard to see. And that's just what I want! It should look scale!
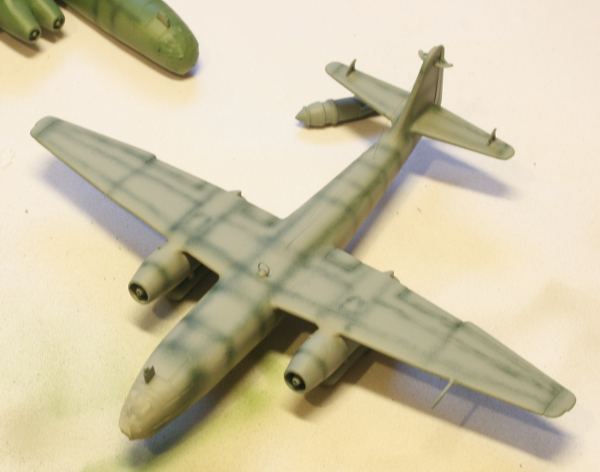
Here you see the primer coat of RLM 2 on my Arado 234 models.
Painting:
Speaking of looking “scale” I want to address the idea of lightening colors to make them look “scale.” This somewhat confusing theory says that when you see a model, being small, it seems like it is a certain distance away. Then factor in “atmospheric Perspective.” This is a real effect where the moisture in air diffuses light to make things look increasingly less focussed, lighter, bluer and less saturated in color, the farther away you are from an object. This is why mountains fade into difuse pale blue on the horizon. And its true. But modelers take it out of context, and by so doing, they lighten the look of their models to the point of looking really wrong. I'm an illustrator. Trust me.
Here's why: The model will be seen in a diorama or on a display shelf or stand. The colors of the surrounding area will be stronger (normal) so when seen adjacent to the model they make the model look even lighter and more washed out than it is. Also, for true atmospheric perspective you have to knock down every color, including silver and black, because full contrast on the model disproves the illusion to the brain. The eye and brain will adjust he colors in your head, so if you don't use atmospheric perspective adjustment to your paint, the illusion is actually more real. Your model will look more correct in its unmodified hues. And thn there is no way to blur the model's detail, so the brain sees it in sharp focus and wants to believe that the colors it sees are true. Even if your model were in a diorama that was 100 percent treated with atmospheric perspective, the sharp focus would cause your brain to disbelieve the effect. Corrections can be done in digital photo manipulation, but not the model itself. Your brain is very good at taking the fact of what it sees and adjusting on its own. It will believe the colors better when viewed under the right conditions rather than painting the model incorrectly.
I should mention that I use unconventional paints. I use artist grade acrylic paint rather than model paint. It has drawbacks, but I prefer it because of some of the advantages. The drawbacks are that it won't stick to polystyrene. You have to spray down a matte lacquer base first. But at that point, it takes the color well. The second problem is that it will hold up to masking if you spray on more lacquer first, but this has limits, and I discovered the limit on this project. The advantages are that this paint is a lot less expensive, you can easily mix the correct hues and shades if you have a good painting guide like Ulmann's book, it can go on really thin to preserve detail, it dissolves in alcohol, it is water soluble, so it cleans out of brushes and especially airbrushes really well, and opacity can be varied depending on which pigments you get. When I worked with model paints I wasted a lot. I lost a lot from it drying out, from cleaning the airbrush, etc. When I switched to artist paints this all changed.
I have pre-mixed several RLM colors. “RLM” stands for the German Ministry of Aviation. You have to paint out and dry test swatches as you prepare them because the acrylics dry much darker than they look wet. I had a lot of RLM 2, and even though it was not used as primer on the real Ar 234s, I used it as a primer on the model to show where there were faults in my putty and sanding job. It took a couple of passes and putty corrections to smooth it out sufficiently, but because the acrylic is so thin, that went quite well.
Remember, the more white in a paint, the more opaque it will be. This is also true when you combine different colors. When you dull down color for warplanes by adding black and white, they also become much more opaque, so even if the base hue starts translucent, by the time the mixing is done you have a very nice opaque color. I used a light primer on the entire aircraft so that all colors would have a unified appearance for areas I left thinly sprayed. Then I used a blackish, slightly greenish shadow color to darken around the main panel lines on both top and bottom of the aircraft. Most of this will be gone when the aircraft is finished, but some will show through to influence the look in a subtle way. It makes a difference.
Shading the panel lines on the 1/72 scale Arado 234 B-2 & C-3
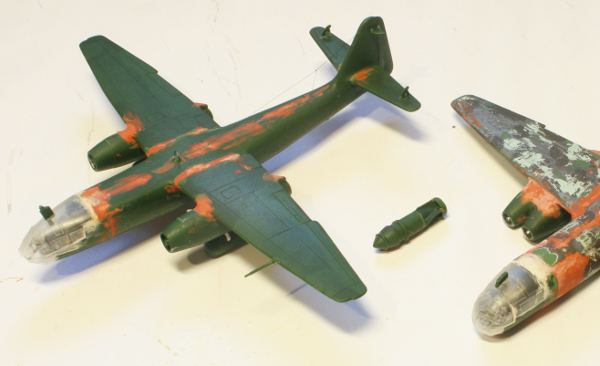
The Ar 234 B-2 has a different color scheme than the 234 c-3. Its underside is the darker and bluer RLM 65 of the earlier war years. The camouflage on the top is the lighter RLM 82 green as a base with the dark RLM 70 sprayed on in splinter pattern. The lighter color let the shadow lines that I previously painted show a little. The Dark covered them, of course, but that is fine.
The Ar 234 C has the upper surfaces painted with the same RLM 82, but instead of the RLM 70, a different splinter pattern of RLM 81 Brown-violet was applied. I don't get why it is considered violet at all. It doesn't appear so. The underside also differs from the B version in that it has the lighter, less saturate blue of RLM 76. No information is given for the markings on my C version. There is a series number on the tail, but no squadron markings, and the splinter pattern described in the kit doesn't resemble any of the references I have found. Since the markings were so bare bones I added red to the jet intakes. This was made from Cadmium red, but desaturated o resemble the RLM red.
The backs of the engines on both were painted a black color with some silver mixed in. When you see the real ones they are greyer, and the wear lets some of the metal show. This part was brush painted, as were the yellow edges on the bomb fins, which were made from Turner's Yellow and pale grey.
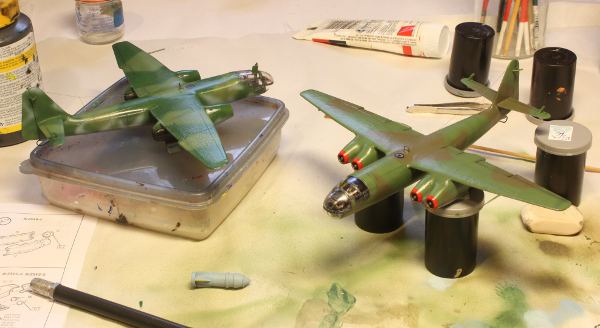
The Arado 234 B and C have different camouflage colors
The underside of the Arado 234 B was painted with RLM 65, light blue after the splinert pattern of the top side was finished.
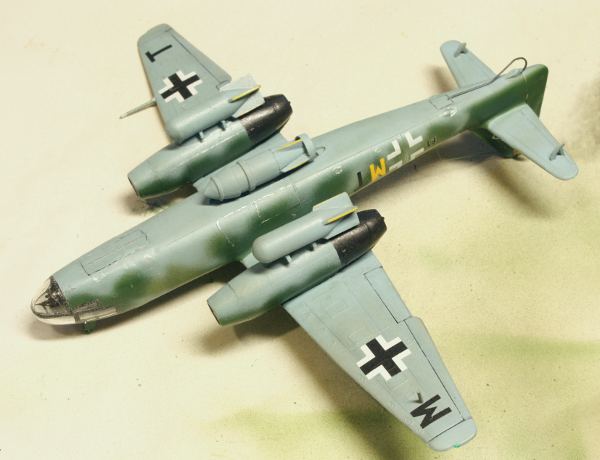
I had to hand paint the white outline swastikas. I curse you model companies! Its hard to do on this scale because they are very thin lines with no black fill. I expected to print swastikas on decal sheet and use those after carefully measuring the sizes for all of the swastikas I need for the many built and unbuilt Luftwaffe models I have, I made a file that would print them all on half a sheet. Then I ran into trouble. My Alps MD-5000 which can print white was printing with lines through the image. I tried printing on my Epson inkjet, thinking the decal sheet was the kind designed for inkjet. But no. It needs laser. So following the advice of some online model building site I took the file on a flash drive to a copy shop. Then to another, and another. Nobody had a machine that prints on the size decal sheet I have! Then a friend gave me a color laser printer. Its not set up yet, and I couldn't wait because I have a commission to work on, so....
Here's what I did. I used a compass divider to find the size I needed after visually comparing to a reference. Then I laid some low tack masking tape on a cutting pad and pricked it. Then I cut the squares of the swastika size. Next I sharpened a 2h pencil to a fine point with a whet stone and drew the swastika construction lines. Each square was then placed on the tail with tweezers and not pressed. I had to peel and move them a couple of times, but no issues there. The next step was to use a fresh point #11 X-Acto and carefully cut the tape deep enough to score the painted plastic lightly. Then I peeled the tape off. But wait! The paint came with it!. What????? I tested it. I used low tack tape! It seems that cutting through weakened the paint film and pressed the tape down into it enough to grab. Well, it was ALMOST clever. But it did leave the scratches I needed as guides, so after a quick spray of fresh paint to repair the camouflage, I still had nice guides to help me. I used a very fine brush, made the paint a thick but flowing consistency and laid down the lines. Corners and uneven strokes were cleaned up with the camouflage colors.
The decals are now added. The swasticas were not included in the kit, so I had to hand-paint them.
Before applying decals I sprayed the areas to be affected with gloss lacquer. You can by Krylon cans with much more in them and for a better price than Modelmaster. The gloss lacquer is necessary to allow the decals to get a better hold and to prevent the decals from having a frosted appearance in the transparent areas. A setting solution (essentially a vinegar) softens the decal and allows it to conform to surface details like rivets and panel lines. I spray a matte lacquer over top to recover the matte appearance of the camouflage and markings. Any details like light covers or tire rubber that was not masked can then be made either glossy or matte with the appropriate liquid lacquer. I leave exposed silver bits like the ends of pitot tubes or any other aluminum matte because aluminum takes on a matte appearance when aged.
The final step was to make a base. I bought a wood disk plaque made of pine and stained it dark walnut before lacquering it. Into this I inserted a brass square-section tube several inches long. I was clever enough to build a slightly larger square-section tube into the belly of the model. t fits the long tube perfectly so the long one of the base bayonets into the one on the model. The one on the model is flush and inside the bomb recess, so it is quite hard to spot. When mounted on the stand, this model seems to be in a climbing attitude, which shows the bombs and the upper surfaces quite well. The square section tubes can be found at the local hardware store.
So what will become of the models? Eventually the plan is to depict them in paintings. I am interested in doing a painting of the Blitz attacking the bridge at Remagen. It is always great to have a decent 3-D reference for getting the light and shapes down correctly. I have used the plastic models in several aviation paintings in the past, and will continue to do so in the future. You can see these paintings in the models pages of my web site or in the other fantasy, science fiction, or historical arts galleries on this site.
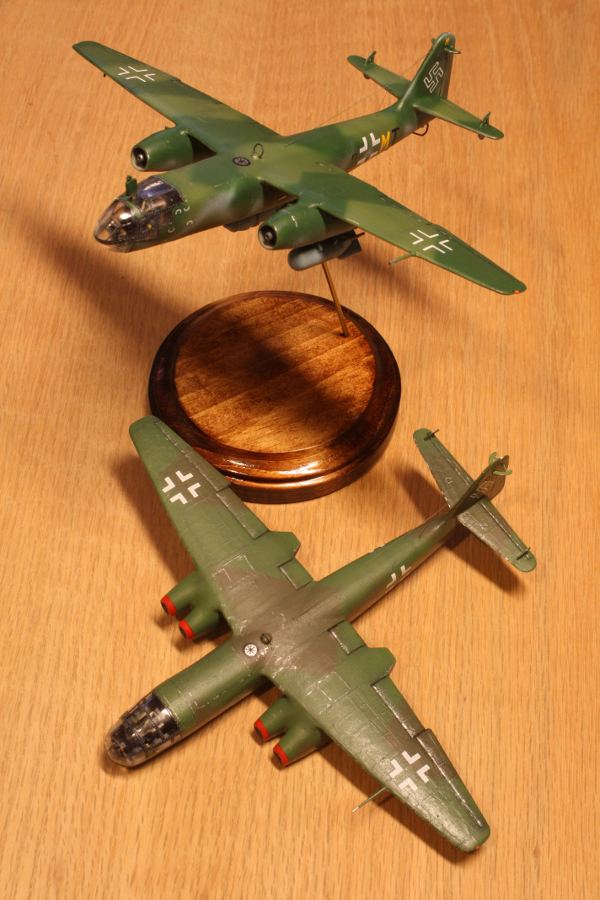 The final artwork. A 1/72 scale Arado 234 B-2 mounted on a display base in flight and an Arado 234 C-3 Built over a course of 40 years... |