
Waxed
Tablets and Stylus
How to
make and Use Them
by
Randy Asplund, © 2012
My Reproduction Waxed Tablets
When I relaunched my web site it was my hope not to leave dead links, but in trimming down the content I decided to leave out my article on making medieval waxed tablets. A short while later I was doing some research on the net and I found quite a few links to my article. Unfortunately they were now only pointing to a page redirecting to my Homepage. I realized that this article was popular enough to put back online, so I have revised and expanded it. I hope more of you will place links to it and especially to my Homepage www.RandyAsplund.com. A further revised and expanded version of this article will be included in my book Secrets of Forgotten Masters.
#
INTRODUCTION
In an age before paper was available, when there were no computers or ipods to keep track of things, people still needed to be able to write down the business of the day. There is a myth that everybody outside of the church was illiterate before the renaissance, and thus didn't need such things. While it is true that many people did not have the need to learn reading and writing, especially in latin, there were still a great many who had to keep notes and records. In antiquity it was ordinary to either know your letters or to be rich enough to own a slave who would serve as your scribe. Even after the fall of Rome there were still people outside of the church who were educated enough to keep inventories and records of sale, collect taxes and to keep track of who owed what. The education of the upper classes grew greatly after 1200 with the rise of universities. People wrote letters, jotted down poetry, made lists, designed machines and architecture, and even kept birth certificates. But what did they use for these writings?
In ancient times Egypt supplied the common stationary of choice. It was called papyrus, but it wasn't cheap and it had physical flaws. It had to be made from reeds cut into thin slices and pounded together until their natural adhesive juices fused them. Panels were pasted together to make long rolls of standard sizes, which were shipped everywhere. Books and many important records were written on papyrus, but it was not reusable, did not edit well, and even books written in it had to be recopied about every hundred years because it broke down.
Animal skins in the forms of parchment and leather have both been used as writing surfaces since antiquity, but both are laborious to make, and the animals taken to provide the skins were very expensive. Using animal skin was a great idea for a book or lasting document, but it could not be edited easily and was thus an expensive waste for composing a work or writing home from the battle front for more socks.
Clay was cheaper, and indeed it was used in many places going very far back in history, but it was bulky, heavier, fragile and had to be baked (costly in wood) in order to make it permanent. Birch bark was used for millennia as a writing surface, and it was actually quite a good one. All you have to do is scratch on it with a point and it leaves a dark line, but it was not reusable or editable either.
The answer was the waxed tablet. They came in many shapes and sizes, and were a very common device. They could be used for permanent records or any writing that came to mind. Their great advantage was that they were completely re-usable, and any mark or script could be edited with great ease. I've made quite a few of these, including as props for television documentaries and a movie, and I have used them in medieval reenactment for many years. I will give you some insight about what they are all about, how to make them so they look authentic, and how to use them correctly.
#
DESCRIPTION
The waxed tablet, also called the pugillare (plural: pugillares), was known in antiquity as the codex, a word originally meaning wooden board. In fact, that is why the modern book configuration is called a codex. Pugillare means "handbook," and sets of pugillares could contain many leaves (pages) of boards bearing colored wax surfaces. They were often (but not always) hinged, so they opened like our modern book. The tablet was written upon with a pointed stylus and erased with a flat shape on the opposite end of the stylus.
The tablet's boards could be made of ivory or whale bone, but most often they were made of wood. Many types of wood were used, including but not limited to boxwood, fir, pine, apple, oak, sycamore, pear and even lime. In my opinion, the best are made from a smooth grain wood that is less porous and soft, so I recommend birch, beech, walnut, cherry and the like. It should be quarter sawn, meaning the board is a slice taken radially from the log, to help prevent warping of the wood later. The wood should also be sealed to prevent moisture from warping it.
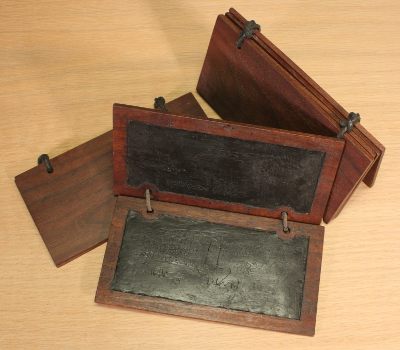
Each tablet has a shallow recess cut into one or both sides. Boards with wax on one side were usually for an outer surface of the collection, and the non-waxed surface could be decorated with carving. The double sided boards would be situated on the inside of the collection. A waxed tablet set could be just two single sided boards joined with a hinge or cords, or it could contain a large number of double sided boards between them, all joined on a couple of long binding cords. Likewise, a set could be unbound, just a collection of boards that belonged together and were kept in a leather case. The boards were usually planed quite thin.
The recess would be very shallow. In fact, many reproductions just look wrong because their boards are too thick and the wax recess is cut too deeply with a router. People making them today tend to pour in too much wax and just plane the wax down flush to the wood surface with a knife. That is not how it was done in historical times, and it is over engineering something simple. The extant tablets I have seen had a very thin layer of colored beeswax, more reminiscent of thick paint than a material with body. The real ones I've seen all had black wax, presumably from lampblack pigment, but we see illustrations of them in colored waxes and I know of a set from antiquity (see the shipwreck tablet below) colored with bright yellow orpiment. There was always a raised margin left around the wax recess. The margin width varied from tablet to tablet. Where hinging holes met the edge of a narrow margin, the margin would wrap out and around the hole, decreasing the recess in that area.
Hinges could be leather thongs, cords, metal rings, or even bone or ivory tube types. For a secure document a third perforation would go through the boards in the middle of the opening side and a cord or thong would be passed through and all around the tablet, being caught in a seal matrix of lead or sealing wax. When the document needed to be inspected, the cord could be cut and later resealed by an official.
 The
shape of the board was usually rectangular. This could be a long or a
squat rectangle. It could also have a stepped gable top (a short
side) like on many gothic altarpieces, or it cold have one of the
short ends rounded as in my reproduction to the right. These later
types are seen in ancient times and
well into the gothic period. A large tablet often had a division
through the middle made by creating two recesses instead of one. This
undoubtedly added strength to resist warping. The top of a tablet was
usually one of the short sides, but it was often used in the
“landscape” orientation. We know this from writings left in them.
The
shape of the board was usually rectangular. This could be a long or a
squat rectangle. It could also have a stepped gable top (a short
side) like on many gothic altarpieces, or it cold have one of the
short ends rounded as in my reproduction to the right. These later
types are seen in ancient times and
well into the gothic period. A large tablet often had a division
through the middle made by creating two recesses instead of one. This
undoubtedly added strength to resist warping. The top of a tablet was
usually one of the short sides, but it was often used in the
“landscape” orientation. We know this from writings left in them.
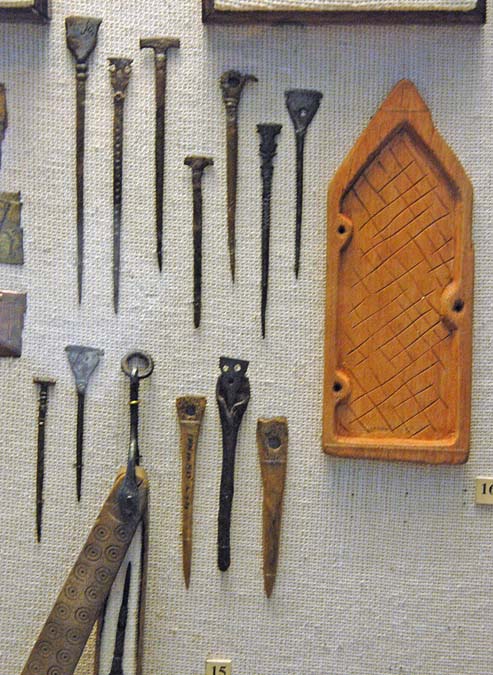
The ensemble was not complete without the stylus. This was a pointed rod of metal or a metal tip held in a bone handle which was used to draw and write in the waxed surface. The opposite end of the stylus usually had a flat, tapered paddle which was used to smear the inscriptions back down into the flat wax surface. Many of these styli were made from a copper alloy (bronze), but some were made of lead or iron. Some were thicker in cross section and some were needle like. The bone and ivory types were usually thicker in section but had a drastic taper like a bullet that terminated in a pointed wire of protruding iron. I know of no extant styli made from wood, but wood is less likely to have survived.
Many people have misidentified a similar tool as a stylus. It looks like the stylus on the pointed end, though usually thick in section, but the top end is usually a ball or acorn-like shape. These are now being correctly identified as “parchment prickers.” That means they are an awl used to perforate the edges of a page for ruling guides. It is an easy mistake to make because in fact there are a number of tools with points on one end but which have very elaborate tops and shapes, including a wave shape for the whole tool in the form of an ornately carved dragon's head. Obviously, the tool is not used as an eraser of the wax. If that means some styli were not intended to also serve as erasing tools, then certainly some of the ball topped “parchment prickers” might also be for writing. That being said, these tools cold have had other uses. A “stylus” without a wax erasing head could be a tool for inscribing under drawings, marking measurements, or blind ruling (a technique of creating a furrowed line with a point).
Waxed
tablets and styli date back to great antiquity. They continued to be
used throughout the middle ages. According to George F. Bass in his
article SPLENDORS OF THE BRONZE AGE (National Geographic, vol. 172,
no.6, Dec. 1987), the oldest known "book" ever found was a
wooden tablet found in a shipwreck off the southern coast of Turkey.
The ship was sunk in the 14th c. B.C. This tablet, made of two
panels, each small enough to fit in the palm of the hand, was hinged
along the long side with an ivory tube hinge. See
the 8th c. Uluburun Waxed Tablet Set
It is suspected that this ancient tablet book may have been a shipping record since it was found in the bottom of an amphora (large ceramic storage jar) filled with pomegranates. However, waxed tablets in general were used for a great number of purposes. They were used as note books, to send important messages, to draft formal writings, design patterns or decorations, to make plans, etc. In the excavation of 14th c. Novgorod, a tablet was found with an alphabet carved into the wooden surface side (Valentin L. Yanin, THE ARCHEOLOGY OF NOVGOROD Scientific American, Feb. 1990). This tablet would have been used by a student learning to write. You can see this gable topped tablet and styli in this image: See The Novgorod Tablet and Styli and again Here.
In
short, tablets were ideal for any kind of temporary composition, but
it doesn't stop there.
I had the opportunity to examine a tablet that was an official Roman Imperial document tablet set at the University of Michigan that had once been sealed with a cord passed through a hole through both panels midway up the side that opens. It is a Roman birth certificate from 128 A.D. for a woman named Herennia Gemella. Both leaves are 6 5/16" high x 5 5/16" wide x 1/8" thick. The border rim around the wax cavity is II/ 16" wide. The black pigmented wax was very thin, and from close inspection I believe it to have been applied with a brush as one would lay paint. The wax did not cover all of the way into the corners, so it was easy to see how thin it was and how deep was the recess. The wax was also somewhat pitted, which in my experiments from laying wax, is consistent with air bubbles in the hot mixture.
The
two panels were joined by cord or thong hinges which passed through a
pair of holes along the long side edge opposite the single hole for
sealing. This created a joined pair, sometimes called a diptych. The
holes looked to have been auger cut (spoon bit), and the surface of
the boards was far from neat. In fact, they showed the marks of the
tools used to create them. On one of the panels an Imperial Roman
insignia was burned onto the outer face. A complete duplicate of the
inside text was also written on the outside of the other panel so it
could be consulted without opening the seal. Should it need to be
verified, an official signatory could be called upon to inspect the
contents and reseal the tablets.
The writing is intact on the waxed surfaces. It was written along the long side direction with letters about 3-4mm high. The point of the stylus glided lightly through the wax, rarely penetrating the thin coating as far as the wood. The grooves cut by the stylus are almost vertical on one side, and at a lower angle on the other side, indicating that the stylus was not held vertically, but at an angle rather more like one holds a pencil.
I had the good fortune to visit the medieval monastery of St. Gall in St. Gallen, Switzerland where I was permitted to examine and measure a tablet codex (book) of eight panels quite closely. They still had the 15th c. German writing cut in the black wax. All of the interior panels were two-sided while the end panels were only waxed on the inside surfaces. There were no holes cut for binding cords, and instead there was a sort of glued-on parchment along the spine. I do not know if this parchment hinging was added at a later date. The grain of the wood is typical of the tablets which I have seen; that is to say that the boards were quarter sawn. The wood grain is rather fine, making a smooth surface.
The dimensions of the tablets are about 14.8cm tall x 8cm wide x 4-5mm thick at the edges. The border surrounding the waxed recess is about 7.5mm along the length and about 1.1cm wide along the short sides. The depth of the waxed recess is about 0.75mm, which leaves about 2.5mm to 3.5mm thickness of wood under the wax of a two-sided tablet. This may seem like a rather tight tolerance for a craftsman to make without error, but actually, there is a set of tablets that show an even greater level of precision. A set of eight boxwood tablets were found in York at a dig sponsored by General Accident known as the Swinegate site in York, England. They are described by Sonia O'Connor in GENERAL ACCIDENT WAXED TABLETS PART 2 as measuring "50mm by 30mm, about 1.5mm thick at the margins and possibly less than 0.5mm beneath the wax! The text of the York Swinegate tablets is laid out parallel to the long axis of the tablets and there are seven lines (of text) on tablet 2, side A."
Her description also reports that there were no hinges or other bindings, and that the tablets were discovered inside a leather case which also contained a small metal stylus. Only the 2nd and 7th panels were hollowed on both sides.
Although cheap and common, some people will always want something more plush. The British Museum has a picture of a whalebone waxed tablet from the later 8th century that has been carved with Insular knotwork on the cover. It is 9.3 x 6.4 cm and has three lines of runic inscription on the wax, written along the long axis. The photo referenced in this link also shows several styli and probable parchment prickers of different materials. The tablet includes two holes for fastening. Like the Bronze Age example, it is small enough to fit in the palm of a hand. The description says the writing is very lightly scribed, but not every scribe was so careful. Other tablets have been found with scratches of letters right down into the wood.
From the northern Polish city of Toruń, dated from the 13th c. to 1530 are 127 wooden tablet boards collected into 16 polyptychs. A polyptych is set of panels joined as one. Most are joined with one or two leather thongs or string. They are filled with black wax. According to the description the sizes range from 41.7 cm long by 21.5 cm wide down to 25.5 cm long by13.2 cm wide. The thickness ranges from 1.2 cm to 0.5 cm. The cover sides were inscribed with designs of plant, animal and mythological beasts.
“The tablets contain financial dealings of many kinds including rents, financial dealings of the municipal council and burghers and those relating to paying off debts. The tablets were also used to write down wilkierze (municipal laws) and resolutions of the municipal council.“
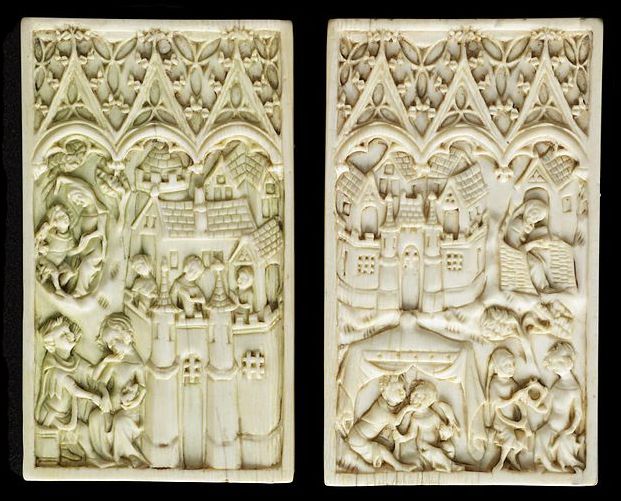
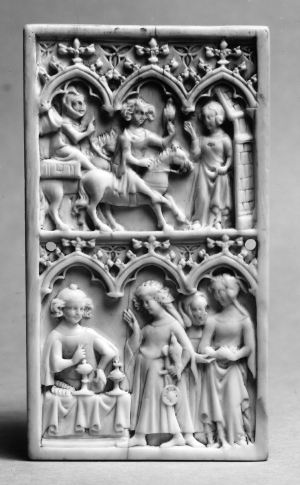
Ivory: In the next two illustrations you will see some examples of even more elaborate waxed tablets carved with intricate designs in ivory. Obviously, doing a deep relief carving required a thicker board and these were luxury items for the noble elite.
The following two image files come from the Walters Art Museum. All artworks in the photographs are in public domain due to age, while the photographs and the descriptions have been released under the Creative Commons Attribution-Share Alike 3.0 Unported License and the GNU Free Documentation License. http://creativecommons.org/licenses/by-sa/3.0/deed.en
Ivory
Waxed Tablet in the form of a box: (accession number 71.283)
Atelier
of the boxes. 1340-1360, Northern France. Dimensions
H: 3 11/16 x W: 2 1/8 x D of tablet and lid together: 7/16 in.
(9.3 x 5.4 x 1.1 cm)
One side of an ivory tablet was coated with wax; then a message was incised in the wax with a stylus and protected by an ivory lid. The little box would be sent to the recipient, who smoothed the wax and responded. The sliding cover depicts three ladies in the town, looking over its walls at two embracing couples seen to the left. The bottom of the box shows the same town at greater distance, a tent with two more lovers, a hawking expedition, and a hermit reading outside his rustic cell. Several writing boxes are known from the same, otherwise unidentified workshop.
France, ca. 1330-40, by an unknown craftsman.
H: 4 9/16 x W: 2 1/2 in. (11.6 x 6.3 cm)
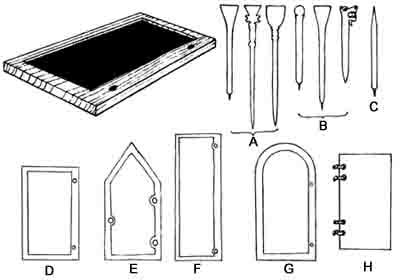
|
A. |
Bronze Styli |
|
B. |
Bone Styli |
|
C. |
Side View |
|
D. |
Typical Shape |
|
E. |
Novgorod, 14th c. |
|
F. |
Springmount Bog, Irish. Early 7th c. |
|
G. |
German, Early 14th c. |
|
H. |
Closure with thong or cord |
USING THE WAXED TABLET:
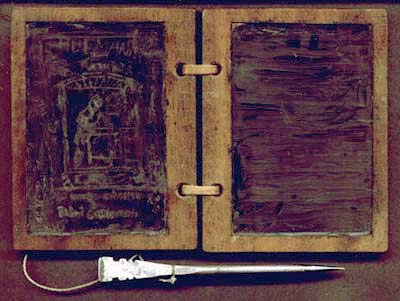
The
image at right is a tablet I
made with a forged iron stylus. It has been used to draw the
preliminary design of my manuscript illumination "Hoffman's Furniture."
You can see the erasing swipes on the right panel.
Waxed tablets had a very thin application of wax, and even in this, the ones I have examined showed that the wax was seldom penetrated to the wood by the stylus. Deep incisions are harder to erase, so that makes sense. I have seen research suggesting that the intention was to cut down to the ivory so the color revealed the lines of script, but I have my doubts based on my observations. My belief is that the light lines were made and that the expectation was to hold the tablet in raking light to reveal the inscription.
Supporting my theory is the fact that the insides of many waxed tablets, while not exactly rough, do have some chisel marks, so they were not well smoothed, which you would expect if you wanted to make small clean lines all the way through. Also, many have a criss-cross of scoring lines over much of the interior surface. These score marks would further hinder the stylus while writing if one's goal was to cut all the way through the wax. I have read several explanations of the reason for this cross-hatching that all say it was to keep the wax adhering to the panel. Again, I think that is an incorrect assumption, and I bet one person suggested it and it became one of those perpetual myths that armchair historians picked-up on. They may be a by-product of the method used to judge how deeply to carve out the recesses so the whole surface was taken down to the same amount. But one thing I do know from experience is that they are superfluous for gripping the wax. The wax will stay on the tablet all by itself, without any such need.
Why did they need so many waxed tablets? The answer is pretty simple. Suppose you want to write a book. Its a long book. You need to compose, but that means editing. To edit you might need to change a word, a sentence, or even switching the order of large passages. You would waste a vast amount of money composing a work on animal skins. The tablet is perfect. Want to move a chapter? Just switch boards. After composing the work, the author would then dictate the text to a professional scribe. That scribe can't hold the tablet in one hand and write with the other. It was up to the author to read the faint inscription and state his words.
Erasing with the flat end of the stylus is easy. And again, we have people who don't know what they are talking about trying to tell us that the wax was edited by scraping it off or rubbing it out by holding the erasing end vertically. Well, that's just not true. You don't want to move the wax around and cause thicker and thinner areas. What you do want is to mush the wax straight down and fill the scratched lines. You do this by placing the tablet on a flat and sturdy surface. Then you hold the stylus at a very low angle to the tablet, and with your pointer finger tip on the top side of the spatulate end you press down as you drag the eraser across the surface. The lines wipe down and leave a smooth surface.
Some people use the round ended styli to rub out the lines. You can do this with sort of a burnishing motion, but my experience is that it moves wax around and creates thick and thin areas. You have to be careful.
###
MAKING THE TABLET
The
process is simple. You will need the following items:
Wooden
Boards (I like a smooth grain hardwood, but the harder the wood, the
harder it is to cut. Boxwood, fir, cherry, maple, walnut, beech and
birch are all good. Poplar is easy to get at home improvement stores
and it is easy to cut, but will soak up a lot of wax.
Something to cut the shallow recess
(X-Acto chisels or a small flat bottom router bit and drill press, or
router table)
An X-Acto or other sharp knife -
X-Acto
(or other) wide blade wood working chisel
A wide, flat, cheap
brush (1" nylon or bristle works well)
Pigment
(Lampblack, medium yellow, earth red, copper green)
An
optional cord or thong (or alternately you can make a tube hinge from
bone or wood using a drill, or from a piece of cane)
A metal
straight edge
A fine tooth saw
A fine point pencil or
scribing tool (optional)
A 3/16" Drill (or spoon
bit)
Beeswax
Small ceramic cup (sake cup)
Oven,
(and mitt or pliers to lift the hot cup of wax)
The first step is to select what type of wood to use and determine the dimensions. In the USA it is possible to buy small 24 inch boards about 3 or 4 inches wide and 1/4” thickness at large home improvement stores. Be wary of warped wood. But while their 1/4” wood will be easier for you to cut, it is too thick for most authentic tablets. For example, a 4 to 5mm St Gallen tablet is less than 1/5 of an inch thick. See the measurements above in the descriptions of extant examples for suggestions on thickness. Also, make sure the grain lines of the wood, as seen on the end of the board when it is laid flat on a table run mostly up and down (quarter sawn), and not curved in the direction of the width, otherwise you may have warping problems. Use a point or a dull knife against the straight edge to score the lines that mark the length of the tablets along the board, but do not saw them off yet.
You may choose any dimension you like, but if you would like to make a typical tablet set I will suggest the following specifications:
Length:
6"
Width: 4"
Thickness: 1/4" (preferably more
like 1/5 to be correct. A small tablet can be made on 1/8 harwood if
the recess is 1/32")
Depth of recess: 1/ 16" to
3/64"
Hinge holes: 3/16 diameter, 3/16" in from spine
and centered 1" from the top and 1" from the bottom.
Spine
margin: 1/4” with margin extension around holes or 1/2" with
the remaining three margins at 1/4".
Decide which side is the spine side and locate the position of the hinge holes. Then drill them just big enough to accept a cord or leather thong. You may either drill this with a normal drill bit, or use an auger point driven by a bow if you want to be more authentic.
You can mark the lengths and widths of the recess/margin edge with either the pencil, or score them directly with the knife. The later leaves an over cut of the score lines that is commonly seen on artifact tablets. It is easy to mark the lengths with a ruler for all of the tablets at once by just running the marking tool all the way down the length of the board. Pick it up where the marks should end, but if you leave the ruler down you will get greater accuracy and save time.
Next cut the edge lines of the recess with the X-Acto blade as deep as the recess will be. The cleaner you make this line, the better your edges will look. This cut is a visible boundary for the recess. The recesses are cut with sharp corners, and one of the way people making tables to sell to re-enactors today ruin the look is to simply run the router and leave the curve of the router instead of cutting it square.
So go ahead and hollow out all of the recesses. I find that the fastest way to do this is to set an X-Acto or other router tip for a depth of 1/16 inch. It can be set up on a drill press and carefully free-handed. Just stay a little off the edges. I used to use a Dremel with a stand and a router bit. It worked if I was careful, but I needed more wood of the same thickness along the sides of my board to support it. Clean out the insides with that. Then take the X-Acto chisel and slice horizontally along the recess floor to remove what remains out to the edge cuts.
However, not everyone has a router, so let's talk about a more medieval way to do it. This technique uses a chisel and knife instead of the router. You should cut with the chisel against a stop. To make a stop, take a small board a bit bigger than your tablet and nail a 1 inch square sectioned rail across the top at one end. Then nail a second one across the opposite side at the other end. Finished. To use it you place the stop over the end of your table so the rail on the bottom catches the table edge. The rail on the top acts to hold your piece in place. Now you can cut in a direction away from yourself in safety.
You will need to be especially careful to cut a consistent depth all the way across. To do this you will cut several grooves or wide scorings about one chisel width apart. When you chisel it down 1/16" inch in many places the areas you leave are your guide for how deep you are. Always cut the groove at as perfect a depth as possible. If you do not have a winged V-chisel of the right depth, use a sharp but thick blade knife and mark it with tape so the depth of cut is indicated so you can score these lines consistently. This will allow you to control the depth over a wide area because by leaving some of the surface you have a point of reference to judge depth.
Clean out the recess down to the depth of the cross cuts with a flat chisel. Get it as flat as you can. Why are the knife cuts diagonal to the grain when it is easier to cut along the grain? Because if you slice in the direction of the grain your lines will be lost in the grain. It is much harder to slice at a right angle, but at a diagonal is easier. You might see a certain cross-hatching of shallow cut marks left on the surface after you finish with the chisel. Sound familiar?
You are now ready to separate the tablets by sawing them apart.
###
THE WAX
Once
the boards are cut and shaped, they should be sealed. Some people use
linseed oil, which eventually dries. I use beeswax. It is an
authentic wood finish and it is the same material as the colored wax
surface. The hot beeswax is painted onto the entire wood board with a
wide, flat brush, after the board has been warmed in an oven. The low
heat assures deep penetration, but I warn you, the board should not be
made HOT. An oven's lowest setting may be too hot, and a hot board will
warp and ruin your work. A quarter sawn board is much less likely to
warp. Just get it warm. Apply
enough wax to completely seal
the pores. It also slakes the recess and the grain at its edge so
that when you apply the colored wax the board won't drink the colored
wax. While the boards are still warm you can wipe the excess off with
a paper towel, or scrape it with a palette knife after it has cooled.
The
amount of beeswax you will need depends the size of the tablet and
the number of them. You will be melting it in a metal or ceramic cup
on the stove or in the oven. I use ceramic sake cups for convenience.
The wax can be melted at a medium low heat so as not to cause a fire.
It needs to be hot enough to brush on without cooling between the cup
and the board.
You
will also be coloring the wax. The Bronze Age wreck used 25% orpiment
in the beeswax. Orpiment (arsenic disulfide) is a medium yellow rock,
which is very poisonous. I don't suggest using it. Instead, you might
consider using something like yellow ocher dry pigment. The most
common color I have found seems to be lampblack, which can also be
bought in a jar of dry pigment, but other colors were also used. Red,
and green appear, but I wouldn't be surprised if blue or purple were
also used. If blue was used, logic suggests that it might be indigo (or
commonly woad) plus white, or if a pale blue were desired fine ground
azurite. If purple were used, it might be a mix of blue and red with a
touch of white, but this is all conjecture on my part.
The important thing seems to be that there is enough pigment to counter the translucency of the wax and create a reflective quality so the inscription can be read. You have a lot of leeway here. Just don't add more than you need to make it opaque. A little bit matte is fine. I am not sure if consistency of texture was an issue or not to the ancient tablet maker, but that being said, orpiment is a heavy, bulky powder from stone compared to lampblack, which is carbon fluff. They couldn't be more different. I have not noticed any difference from mixing a bit more of the pigment to a bit light on the pigment, or from a bulk material like orpiment stone to a finer material like lampblack, other than the mineral can tend to settle out in the cup of hot wax and thus takes more care to apply. Your wax should not tend to produce a lot of curls when you write, and it should be easy to smooth with flat wiping pressure from the erasing head of the stylus. For this reason the paraffin of household candles is a lousy wax, and beeswax works great. It should not be too pasty, yet it should be soft enough that it can be mushed around a bit with that same flat paddle end of the stylus.
Orpiment
is a heavy color and thickens the consistency quite a lot. I have
personally examined the lampblack used actual medieval and ancient
tablets and it
did not look to have such a high concentration of the light and
fluffy lampblack as to create the same texture as the orpiment wax
that I made with ancient proportions.
Place more wax into the cup and add enough lampblack to make it opaque. That is actually a lot of color by volume, but not by mass since it is a color with little body. The colored wax will flow a lot better if you paint it onto pre-warmed wood, but that isn't required. Use the flat paintbrush (an old 1 inch wide works well) and apply one thin layer of wax to the inside. You will have better results if you lay strokes next to each other with minimal overlap. Don't worry about filling perfectly into the corners. The ancients didn't worry about it. Don't worry about bumps and ridges. You will smooth them out later after it cools.
If you would like to manufacture some lampblack of your own you will need some kind of oil that will produce a dense carbon smoke. Linseed oil, a common furniture finish at many stores, will be perfect and authentic. Olive oil also works, and so does canola oil. If you don't happen to have a nice little medieval ceramic oil lamp handy you can fake one by filling a metal jar lid or other shallow metal or ceramic receptacle with the oil and placing a piece of string or cotton cord from a mop as a wick into it. Wave a cold metal plate such as a cookie sheet or pizza tray over the flame to collect the soot. This soot can be collected by scraping it into a jar with either a wooden slice or some other similarly edged tool, such as a credit card.
Once the wax is aplied, join the boards by sewing leather cords into loops or by tying cords, or build a tube hinge if you know how.
###
THE STYLUS
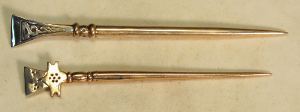
I
have made my styli from bone, iron rod, and cast bronze and lead. I've
seen some that may be tablet styli and did not appear to have had the
metal point, but this is not clear. The tools may have had other uses.
One was a long slender triangle of bone that tapered gradually from a
short flat edge end to a point.
Making the common round bone stylus was easy. I found a solid bone and roughed out a blank about 4" long. Wear a mask if you use a power device like a band saw or belt sander so you don't inhale the dust. Then I drilled a hole in the end that would become the point. Into this I pounded a 1/16 diameter nail until it jammed in there. Don't force it or it will break the bone. Drop in some cement if you feel the need. The other end of the nail was nipped off and then filed to a slender point. The point (before sharpening) can be used as both a temporary holding place and a centering guide for carving the cylindrical shape of the handle. I rough it down with a grinder and finish with files. In the middle ages and earlier it was common to use a bow lathe. Make the blade edge of the erasing end a bit wider than the shaft. Also, the tip of the writing end of the bone should be rounded down like a bullet shape to the metal point, or given an abrupt taper, so the point is visible while you write.
A metal stylus can be created by forging a soft 1/4 inch nail or some other soft iron, copper or brass rod. You will need some kind of anvil and hammer, some form of heat (like a propane torch) to anneal (soften) the metal, and a metal container of water for quenching. You will also need long pliers to hold the nail while you heat it and hammer it. First, soften the nail head with heat from the torch until it is red hot, and then forge it with downward strokes aimed more back toward the shaft. The idea is to spread the metal wide, not grow it longer as you taper the shape to a wide, shallow bevel. It will be irregular at the end, but you will grind or file it flat to finish it. Never pound the metal so much that it cools, hardens and cracks. You'll have to anneal the metal a few times during the forging. This will keep it soft enough to to spread wide without work-hardening to the point of cracking. You can finish by grinding and filing. The taper should be flat on both sides and I like to round the corners of the edge just a bit so they don't leave lines in the wax.
Once you have succeeded with the erasing head you can taper the point. You will probably want to give it a very long and gradual taper, always keeping a round section, all the way to the point. I do most of this on a grinder and I finish it with files.
A really nice stylus has some kind of decoration on it. These can be carved, punched, drilled or filed depending on your material. Some fancy styli were cast in metals such as bronze, so indulge yourself!
And happy writing!